And there you have it! Strakes on and doors working.

Here's a good tip I learned. Its hard to get the glass to stick on the sharp corners on the strake cutoff. Try covering the glass with saran wrap followed by foam rubber followed by tape to compress the foam against the glass and in turn against the strake. Works like a charm.

Then the strake cutoff is glassed back on and its "fit and file" time again.

The door looks kind of sad after you cut it loose. This is when I realized how much work I had left to do on the doors. More on that to come.

The strake is cut off to free the door. The factory recommends cutting it off before glassing on the closed strake. I tried one side before glassing and the other after. I didn't find much difference in degree of difficulty.

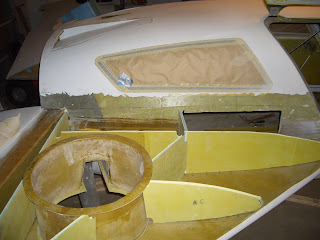
You can see the cap strips in the photo with the Jeffco sealant applied. There is a picture of the inside of the strake cutout as well. You can see the Atkinson lighted sight guage in the rear.


Next came the fuel strakes. The key here is to take away a little at a time when cutting the strakes to fit. Its easy to remove a little more, but harder to add it back. Note that the lines are drawn on the lower strake to indicate baffle placement. Matching numbered index marks are then placed on the strake and baffles.
You take out the baffles, put on the strake top and measure the height of each baffle at each index point. Ex. B1-6inches, B2- 6 1/2 inches, etc. Then you file the baffle down to the measurements at each point and refit until they fit perfectly.
You can see the foam relieved from the edges of the baffles for the micro fillet. I laid up 1/8 inch foam sill sealer covered with duct tape on the strake top then put it on top of the strake with flox fillets to make nice cap strips.


No comments:
Post a Comment